A camera jib, also known as a crane, is a vital tool in the world of filmmaking. It allows for smooth, sweeping camera movements, adding a professional touch to your videos. However, commercial jibs can be quite expensive. This is where a DIY camera jib comes into play.
Not only is it cost-effective, but it’s also simple to build, requiring only a few common materials. This article will guide you through the process of creating your own camera jib, perfect for lightweight cameras and ideal for those on a budget.
Materials Needed
Before we start, gather all the necessary materials. You will need:
- A 0.75″ square tube, 4′ long for the top and 3′ long for the bottom
- Two pieces of 0.75″ square tube cut to 7″ long for the rear brace
- Two pieces of 1″ angled aluminum cut to 3″ wide for the base of the rear brace
- Two pieces of 1″ angled aluminum cut to 7″ long for the front brace
- 1″ angled aluminum cut to 3″ wide for the top stage
- 1/4″ nuts and bolts
- Nylon washers
- Scuba diving weights for counterbalance
These materials are inexpensive and can be found at most hardware stores.
Building the Jib Under $100 Step by Step
Step 1: Assembling the Rear Brace
Start by taking the two 7″ pieces of 0.75″ square tube. Drill a 1/4″ hole at the top of each piece, and then another hole 2.75″ below the first hole. These pieces will form the rear brace of your jib.
Next, take the two pieces of 1″ angled aluminum cut to 3″ wide. Fit these to the bottom of the brace and drill through. This will create a base large enough to mount a quick release.
Step 2: Assembling the Front Brace
For the front brace, take the two 7″ pieces of 1″ angled aluminum. Drill a 1/4″ hole at the bottom of each piece, and then another hole 2.75″ above the first hole.
Step 3: Mounting the Top Stage
The top stage is where your camera will sit. Take the 1″ angled aluminum cut to 3″ wide and mount it to the front brace. Drill holes through the front brace to secure it. Use a bolt under the stage to hold a small camera quick release adapter. This will allow you to easily attach and remove your camera.
Step 4: Adding the Counterweight
To balance the weight of the camera, you’ll need to add a counterweight to the back of the jib. Bolt the scuba diving weights to the back of the jib. The weight you need will depend on the weight of your camera, so you may need to adjust this later.
Step 5: Final Assembly
When assembling the jib, use nylon washers between any pieces of metal. This will reduce friction and allow for smoother movement. Make sure all parts are securely fastened and the jib is balanced.
Step 6: Testing the Jib
Once your jib is assembled, it’s time to test it. Attach a lightweight camera and check for smooth movement and stability. If the jib tilts to one side, adjust the counterweight until it is balanced.
Also Read: Manfrotto 701 vs. 501 Pro Video Fluid Heads
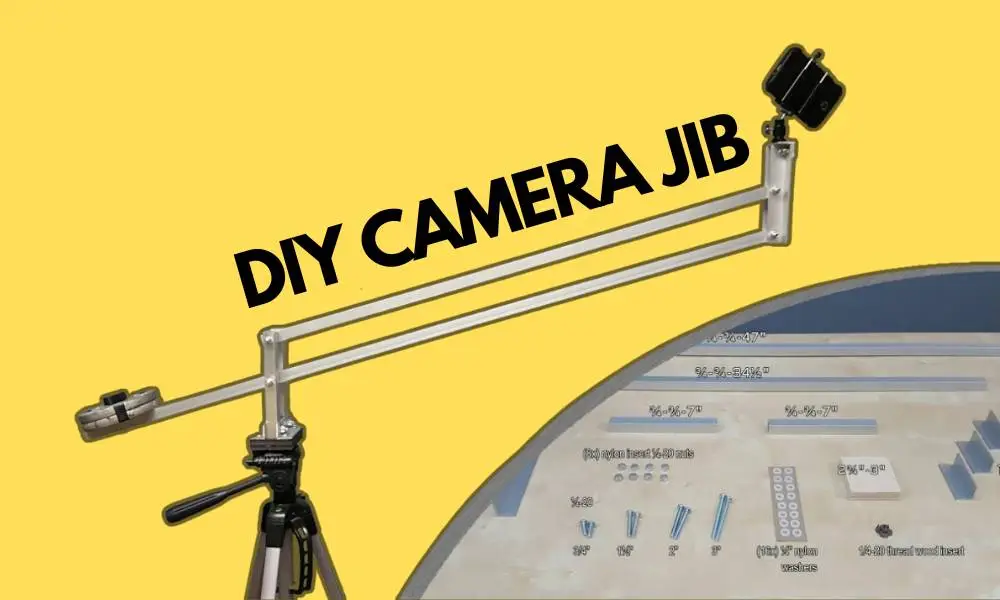
DIY Camera Jib Under $50
This guide will walk you through the process of building your own camera jib for less than $50, based on a tutorial from 2017.
This is a great project for those who are interested in videography but are on a budget. The instructions are based on a YouTube video tutorial which you can find here.
Materials Needed
Before you start building, you’ll need to gather the following materials:
- Aluminium Square Tube:
- (1x) ¾” – ¾” – 47″
- (1x) ¾” – ¾” – 34″½
- (1x) ¾” – ¾” – 7″
- Aluminum Angle:
- (2x) 1″ – 1″ – 6″
- (3x) 1″ – 1″ – 3″
- Plywood:
- (1x) 2″¾ x 3″
- Bolts and Nuts (1/4-20 Thread):
- (2x) ¾”
- (2x) 1″½
- (2x) 2″
- (2x) 3″
- (8x) ¼-20 Nylon Locknuts
- (16x) 1/4 Nylon Washers
- (1x) ¼-20 Furniture T-Nut
- Counterweight:
- (2x) 2.5LBS weight
- (1x) ¼-20 x 2″ bolt and ¼-20 nut
- (1x) ¼-20 thread plastic knob
Step-by-Step Guide
- Preparation: Gather all your materials and ensure you have a clean, safe workspace to start building your DIY camera jib.
- Building the Frame: Using the aluminium square tubes and angles, start building the frame of your jib. Follow the measurements provided to ensure the correct size and shape.
- Adding the Bolts and Nuts: Secure the frame using the bolts, nuts, and washers. Make sure to use the nylon locknuts to prevent the bolts from loosening over time.
- Attaching the Plywood: Attach the piece of plywood to the frame. This will serve as the base where your camera will be mounted.
- Adding the Counterweight: Attach the counterweights to the opposite end of the jib. This will balance the weight of the camera and allow for smooth, stable movements.
- Final Adjustments: Once everything is assembled, make any necessary adjustments to ensure the jib is balanced and stable. Test the jib with your camera to make sure it can handle the weight and operate smoothly.
Tips: Safety Precautions
Safety should always be your top priority. Make sure the jib is securely mounted on a tripod with a fluid head for panning. This will provide stability and allow for smooth left and right movements.
Remember, this jib is designed for lightweight cameras. Overloading it with a heavy camera could cause it to topple over or break.
FAQs
What are the benefits of using a camera jib?
Using a camera jib offers several benefits for filmmakers and videographers, including:
- Dynamic camera movements: Jibs allow for smooth, sweeping camera movements, adding a professional touch to your videos and enhancing the visual storytelling.
- Versatile angles: Jibs enable filmmakers to capture a wide range of creative angles and perspectives, including high-angle shots, low-angle shots, and tracking shots.
- Improved accessibility: Jibs can be used to capture shots in concealed or hard-to-reach areas, providing the necessary angle of vision for the operator to perform the lift.
- Increased productivity: Camera jibs can help improve productivity on set by allowing operators to quickly change angles and capture shots more efficiently than with a tripod or dolly.
- Height adjustments: Jibs allow for easy height adjustments, enabling filmmakers to capture shots from various heights, such as looking down on a scene or moving down to bring the viewer into the scene.
- Enhanced safety: By providing better visibility and eliminating blind spots, camera jibs can help improve safety on set, especially when working with heavy or hazardous loads.
Overall, using a camera jib can greatly enhance the quality and variety of shots in a film or video production, providing filmmakers with a versatile and valuable tool for capturing dynamic and visually interesting footage.
Also Read: Want to improve handheld stability while using a jib? Explore our tips on shooting with a monopod for additional support and control during your shoots.
How does a camera jib compare to a crane in terms of movement?
Based on the information provided in the search results, here is a comparison table of a camera jib and a crane in terms of movement, suitability for different scales of production, size and portability, and operational control:
| Feature | Camera Jib | Camera Crane |
|---|---|---|
| 360-degree movement | Known for their ability to capture 360 degrees while panning, tilting, and working both vertically and horizontally for smoother transitions. | Not specifically mentioned, but as a larger device, it may have limitations in achieving full 360-degree movement. |
| High and low angle shots | Capable of taking high and low angle shots. | Designed for taking high and low angle shots. |
| Vertical and horizontal movement | Works both vertically and horizontally. | Not specifically mentioned, but as a larger device, it may have limitations in achieving both vertical and horizontal movement. |
| Suitability for different scales of production | Often used in professional settings and film studios, but also suitable for smaller productions like YouTube videos due to their smaller size and flexibility. | Typically used in larger-scale productions due to their size and capacity to lift a full-sized camera and operator. |
| Size and portability | Smaller than traditional camera cranes, allowing them to move more flexibly without disrupting the filming process. There are also small jibs for handheld cameras, common in smaller productions. | Larger device, might or might not be self-propelled and powered. The size of the crane is paramount when determining a rig that is right for you. |
| Operational control | Can be controlled either mechanically or manually. Some jibs use electric motors and are controllable at a distance. Most of the time, jibs come with a remote control system. | Usually includes a seat for the operator, and quite possibly the AC or Director. The operator controls the camera as it moves up and down. |
Note:
Please note that the terms “jib” and “crane” are often used interchangeably in the film industry, and a jib is essentially the arm of a crane. However, there are differences in their size, portability, and operational control, which can affect their suitability for different scales of production and types of movement.
How can I enhance my videography setup on a budget?
If you’re looking to expand your videography toolkit with budget-friendly solutions, the Portable DSLR Mini Jib Video Camera DV Crane 4FT from ePhoto is a fantastic starting point.
Its aluminum construction and compact design make it a versatile choice for on-the-go shooting.
However, if you’re feeling a bit more adventurous and want to explore the world of DIY filmmaking, this DIY tutorial allowing you to craft your own camera jib on a budget.
Final Words
Building your own camera jib is a rewarding project that can greatly enhance your filmmaking capabilities. It’s cost-effective, simple to assemble, and perfect for those using lightweight cameras.
With this guide, you now have the knowledge to build your own. Remember to maintain your jib properly and store it safely when not in use. Happy filming!
DIY Camera Jib Tips
- Start small – build your skills with a portable jib for lighter cameras before going big.
- Use quality components – don’t risk equipment with shoddy DIY builds.
- Work safely – be cautious of pinch points and have a wide clearance area.
- Customize the design – make the jib to fit your needs and shooting style.
- Have fun! – take on the challenge of creating your own camera jib and enjoy using it.